Create Fast, Fault-Tolerant ETL Pipelines with Google Kubernetes
Author :: Kevin Vecmanis
In this post I do a walk-through demonstrating how to distribute a data ingestion process across a Kubernetes cluster to achieve fast, inexpensive, and fault-tolerant data pipelines on Google Cloud Platform. This model can be used for many kinds of distributed computing - not just data pipelines! I enjoyed learning this because it cut my data processing costs for VanAurum significantly. I hope you enjoy it!
In this article you will learn:
- What Pre-emptible Compte Engines (PCEs) are on Google Cloud Platform (GCP)
- The pros and cons of using PCEs
- How to provision clusters of PCEs to execute programs using Google Kubernetes
- How to make a distributed data pipeline fault tolerant on GCP
- How to create a job qeueue with Google Pub/Sub
- How to package your ETL pipeline code in a docker so that it can be deployed in a Kubernetes cluster
- How to integrate Google Cloud Storage into your pipeline
Who should read this?
- You should already be familiar with the Google Cloud Platform console
- You should be familiar with using console commands
- It helps if you have a familiarity with docker files, but I do my best to walk through this.
- This isn’t an introductory tutorial on using Google Cloud Platform.
Table of Contents
- Introduction
- Preemptible VM Instances
- Principles of Distributing Workloads
- The pipeline being built
- Create Pub/Sub Publisher Topic in Google Cloud Console
- Building the Pub/Sub message queue
- Creating the Kubernetes Cluster
- Coding the Master Node and Worker Nodes
- Packaging and Containerizing the Program with Docker
Introduction
I just finished rebuilding the back-end architecture for VanAurum on Google Cloud Platform - for now my backend is still running on Heroku, but there was one big reason for switching it - cost!
VanAurum’s existing backend uses a horizontally scalable worker process to ingest, transform, and load data into its primary database. Heroku is a great platform, but the dyno tier required to achieve this is really expensive. So what’s so much better about Google Cloud Platform?
Pre-emptible Compute Engines
Pre-emptible Compute Engines (PCEs), as Google calls them, are essentially excess compute engine capacity that Google has laying around that hasn’t been provisioned. They make it available to anyone at discounts of close to 80%. The catch is that at any time Google can send a SIGTERM termination notice to your virtual machine and take that compute engine back. If you have a process running on it - too bad!.
For some applications, being abruptly terminated isn’t something that can be tolerated. But if you can design your program to be fault tolerant you can leverage the major cost savings of PCEs to build powerful data pipelines for a lot less money. So this is what I did.
The rest of this post details the architecture of my new data pipeline, and the code I implemented for executing it.
How Preemptible Virtual Machines work on Google Cloud Platform
Straight from Google, they say this about preemptible VMs:
A preemptible VM is an instance that you can create and run at a much lower price than normal instances. However, Compute Engine might terminate (preempt) these instances if it requires access to those resources for other tasks. Preemptible instances are excess Compute Engine capacity so their availability varies with usage.
If your applications are fault-tolerant and can withstand possible instance preemptions, then preemptible instances can reduce your Compute Engine costs significantly. For example, batch processing jobs can run on preemptible instances. If some of those instances terminate during processing, the job slows but does not completely stop. Preemptible instances complete your batch processing tasks without placing additional workload on your existing instances, and without requiring you to pay full price for additional normal instances.
Preemptible Instance Limitations
Preemptible instances function like normal instances, but have the following limitations:
- Compute Engine might terminate preemptible instances at any time due to system events. The probability that Compute Engine will terminate a preemptible instance for a system event is generally low, but might vary from day to day and from zone to zone depending on current conditions.
- Compute Engine always terminates preemptible instances after they run for 24 hours. Certain actions will reset this 24 hour counter.
- Preemptible instances are finite Compute Engine resources, so they might not always be available.
- Preemptible instances cannot live migrate to a regular VM instance, or be set to automatically restart when there is a maintenance event.
- Due to the above limitations, preemptible instances are not covered by any Service Level Agreement (and, for clarity, are excluded from the Google Compute Engine SLA).
- The Google Cloud Platform Free Tier credits for Compute Engine do not apply to preemptible instances.
Unpacking this, there are clearly some design constraints to consider for our ETL pipeline if we’re going to use these.
- Our instances can be shut down at any time. This has a few implications:
- We should probably have at least one instance (master) that is not preemptible. We want at least one soldier standing that can re-provision clusters in the (unlikely) event that the entire preemptible cluster gets preempted.
- Our pipeline queue should be designed that cluster nodes only flag jobs as complete after execution is finished. If we flag them as complete at the beginning, there’s a chance the instance will be terminated before job completion. In other words, if a node gets terminated we want its job to go back in the queue.
- The preemptible instances can’t migrate when they get a termination notice, and they can’t restart automatically. This means:
- Each job should be self-contained, repeatable, and be executable on any machine. Because the machine can’t restart, it’s job will go back in the queue for another node to complete.
- Preemptible instances might not be available. The implication here is that our job shouldn’t be extremely time critical. By leveraging a swarm of nodes and a master that can’t be terminated, we’re going to end up with a very reliable and fault tolerant system. There is, however, a risk that your master node can’t provision a cluster large enough to execute the jobs within a predefined timeline. This risk is small.
To read the entire section on preemptible VMs, visit Google’s documentation page here: Preemptible VM Compute Engines.
I’m going to move on now that we have an understanding of what we’re dealing with.
General Principles of Distributing Workloads
Now that we have some PCE constraints informing our design decisions. Let’s walk through some of the general principles of workload distribution.
Imagine a situation where you have 50 compute tasks to execute, and you have 5 computers at your disposal. An easy way to assign this would just be to say, “Computer 1 gets the first 10 tasks, computer 2 gets the next 10 tasks…so on and so forth”. In other words, you just give each computer 10 tasks to complete. There are some key problems with this methodology:
-
You’re only as fast as your slowest machine: Suppose all tasks aren’t equal. If one computer has 10 tasks that take longer to execute, our overall process latency is bound by the execution time of these 10 tasks. In addition to this, if the other computers finish early we have compute resources that are wasted sitting idly by while they wait for their slower partner to finish.
-
What happens if a computer dies?: If a worker dies, the only real fix is to assign the workload to a different machine. This can increase the latency of the computation substantially. On top of that, it’s possible any work executed by the machine before it died is lost as well - resulting in unecessary computation.
The best solution is to adopt a dynamic job assignment, versus a static one described above. A good anlogy for dynamic work assignments is how an ant colony consumes food.
Ants eating a pile of crumbs
You’ve likely seen this before - but when food is on the ground that is within reach of an ant colony, think about how they “process” the food and bring it back to the colony. They don’t look at it and divide the pile into sections, and assign those sections to ants. Instead, they swarm it. All the ants grab whatever piece is available according to their own ability and carry it off to the colony. If there are enough worker ants, they will cover the entire surface area of the food as they pick it apart. They’re only limited by the consumable surface area of the food and the number of ants in the colony. If an ant dies or gets stepped on before bringing the food back, another ant comes by and picks up what was dropped and continues on. This is an exceptionally efficient process and you see this swarm method almost everywhere in nature: birds, fish, bacteria, etc…
With our dynamic work assignment - our cluster of preemptible compute engines is our ant colony, and the pub/sub messages queue is our pile of food. We want our compute nodes to bite off pieces of the job queue as fast as possible - and the more of them the better. They’ll take jobs when they’re ready and until the queue is gone, and have no other restrictions.
In this design, our “swarm” of computers is going to be managed by Google Kubernetes Engine.
The Pipeline Being Built
Before we dive into the details, I want to walk through the high-level task at hand. We want to build an ETL pipeline that does the following:
- Download price data for 300 asset classes from an external provider
- Clean each data set and enforce datatypes.
- Map additional features and indicators (standardized schema)
- Convert to .csv file and push to Google Cloud Storage as an intermediate holding container.
The nice thing about this is that it’s the same process for each asset class that we download price data for. Sounds like something that can be distributed in a cluster, right?
At a high level, our process will look like this on Google Cloud Platform:
- From a master node, publish a list of asset classes to Google Pub/Sub. This master node can be a local laptop, or a dedicated compute instance on Google Cloud.
- Use Kubernetes to manage a cluster of nodes that are each subscribers to our master node’s published messages. Each node pulls one message (an asset tag that needs to be downloaded).
- The node executes the pipeline steps, and…
- If successful, it sends an
ack()(acknowledged) message back to the publisher. - If an error occurs during the process, a
nack()(not acknowledged) is sent back and message is added back to the queue. - If node is preempted (terminated), no message is sent back and message remains in the queue for another node to take.
- If successful, it sends an
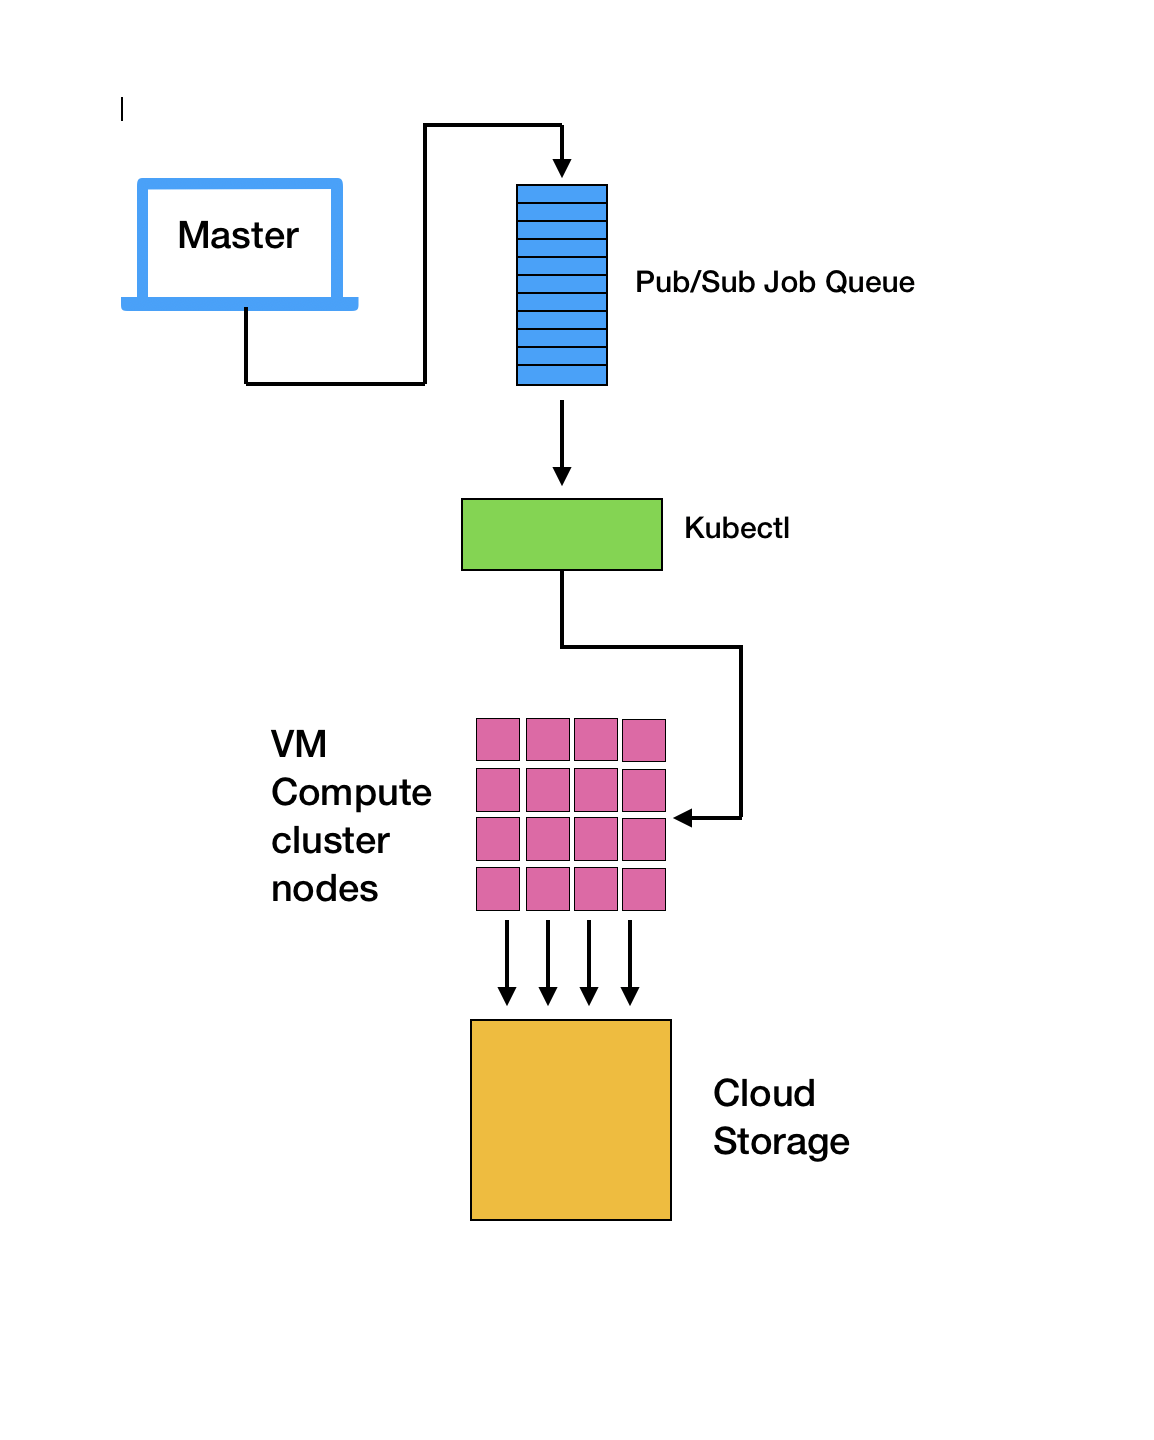
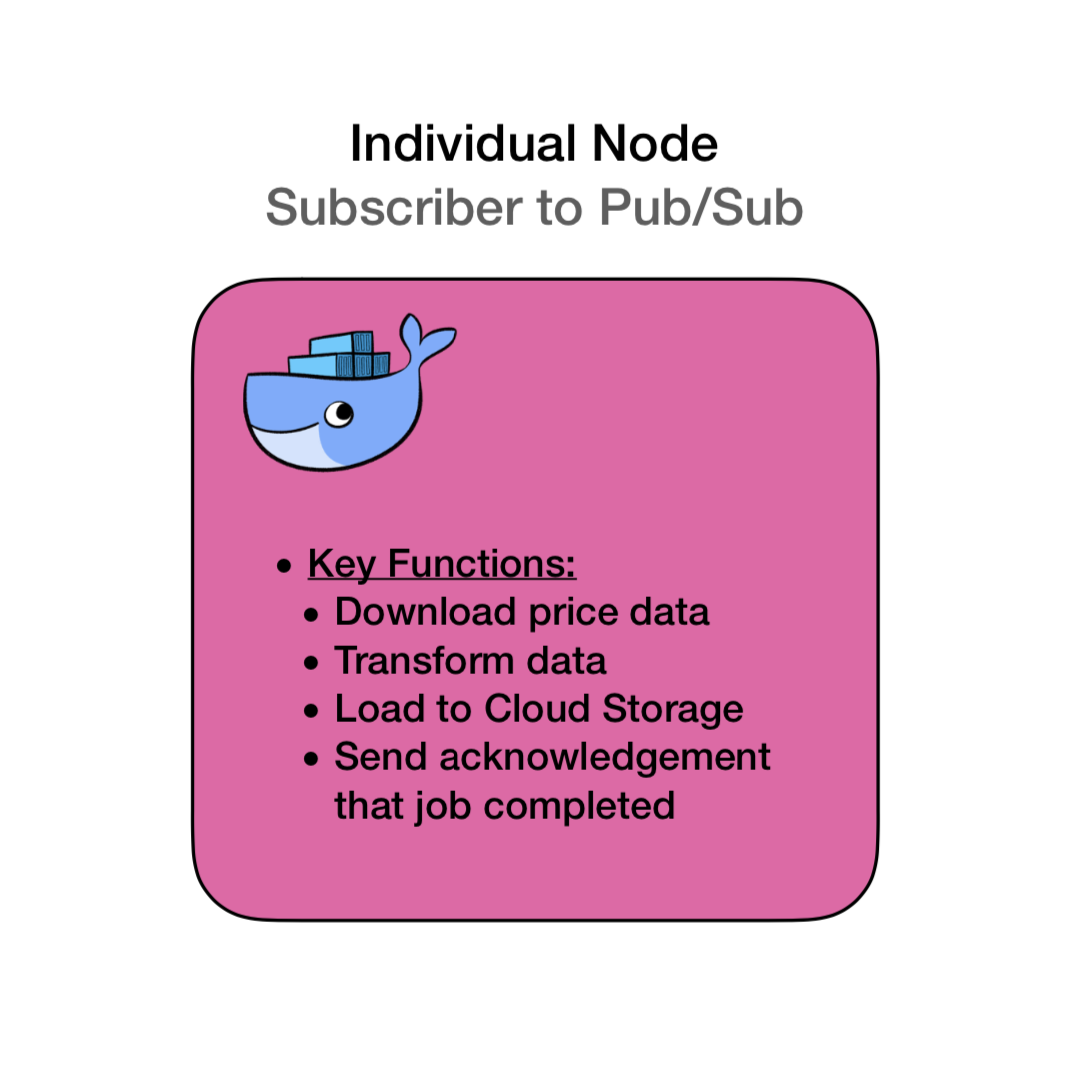
Each of the pink nodes in this diagram is a dockerized container. Each has the same dedicated pipeline program on it and all the dependencies required to execute the code.
Create Pub/Sub Publisher Topic in Google Cloud Console
If you don’t already have a Google Cloud Platform billing account you’ll need to create one. Follow the instructions here if you don’t: Create Google Cloud Billing Account.
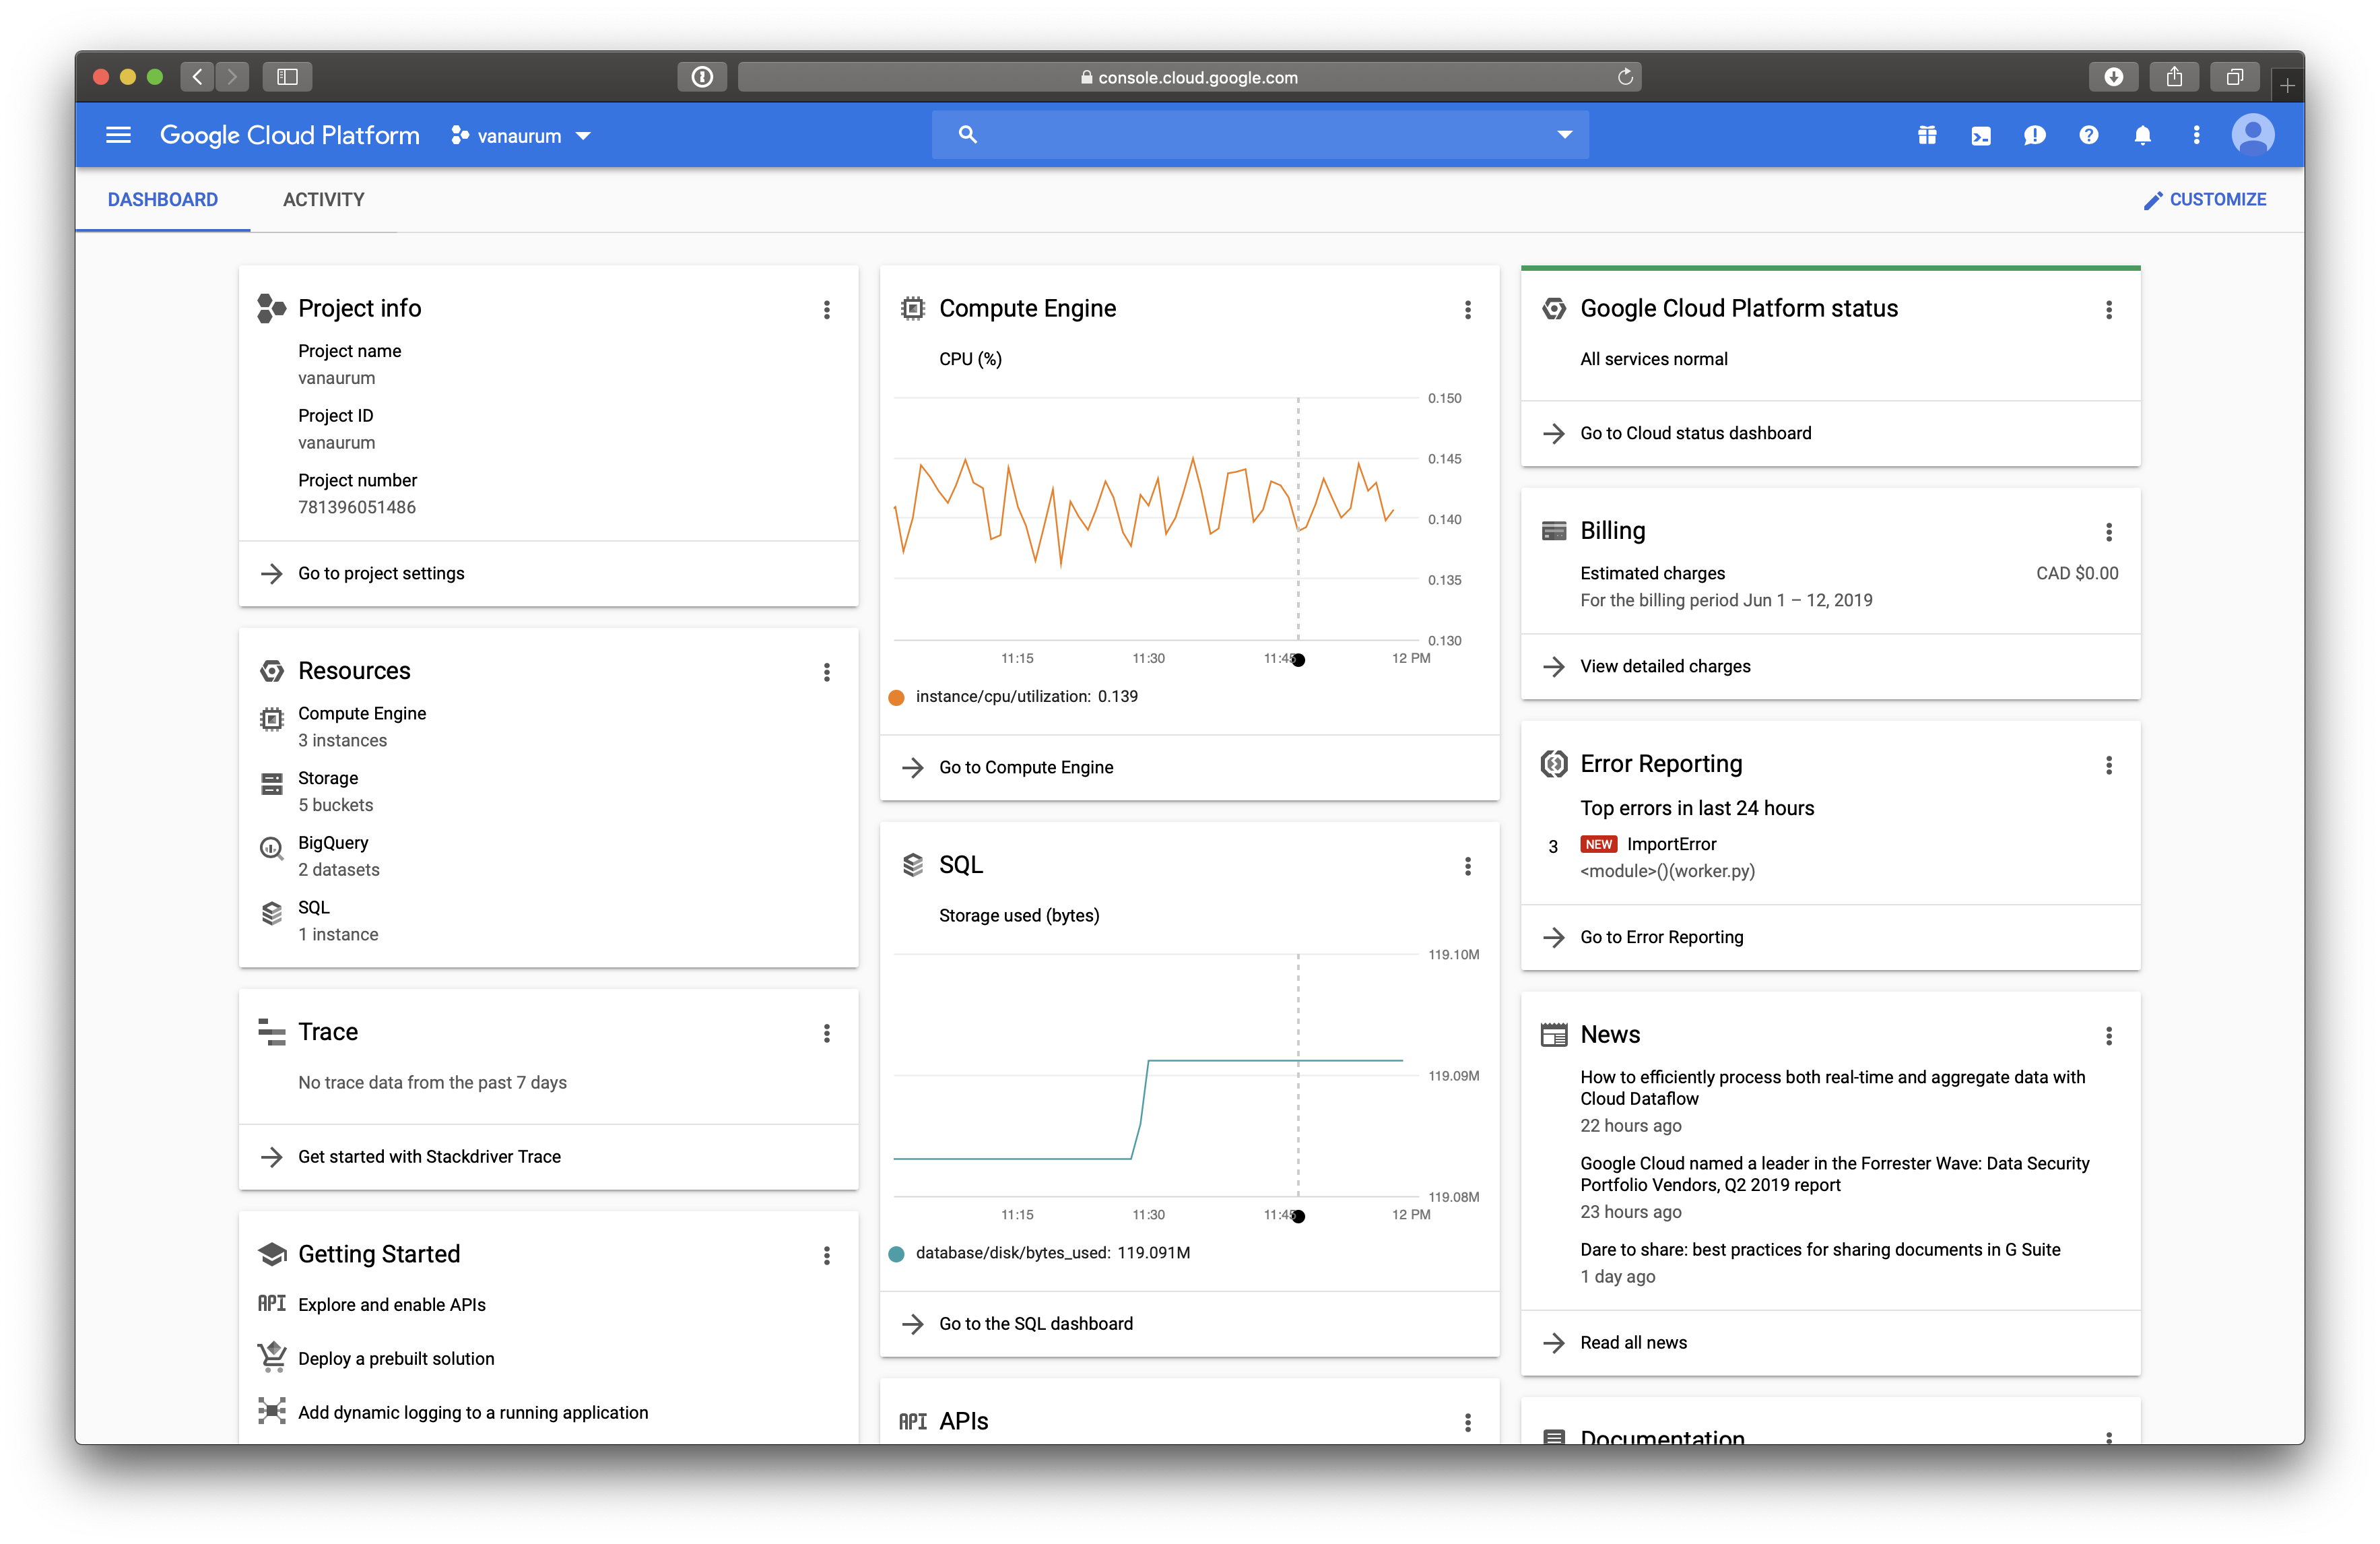
There are programmtic ways of building these queues, but here we’ll use the console user interface because it’s way easier. Navigate to your cloud console - mine looks like this:
Next, click the menu on the top left-hand corner and navigate to Big Data –> Pub/Sub. Click Create Topic and give it a name. The topic I use in this example is vanaurum-etl-queue. You should see it in your list of topics like this.
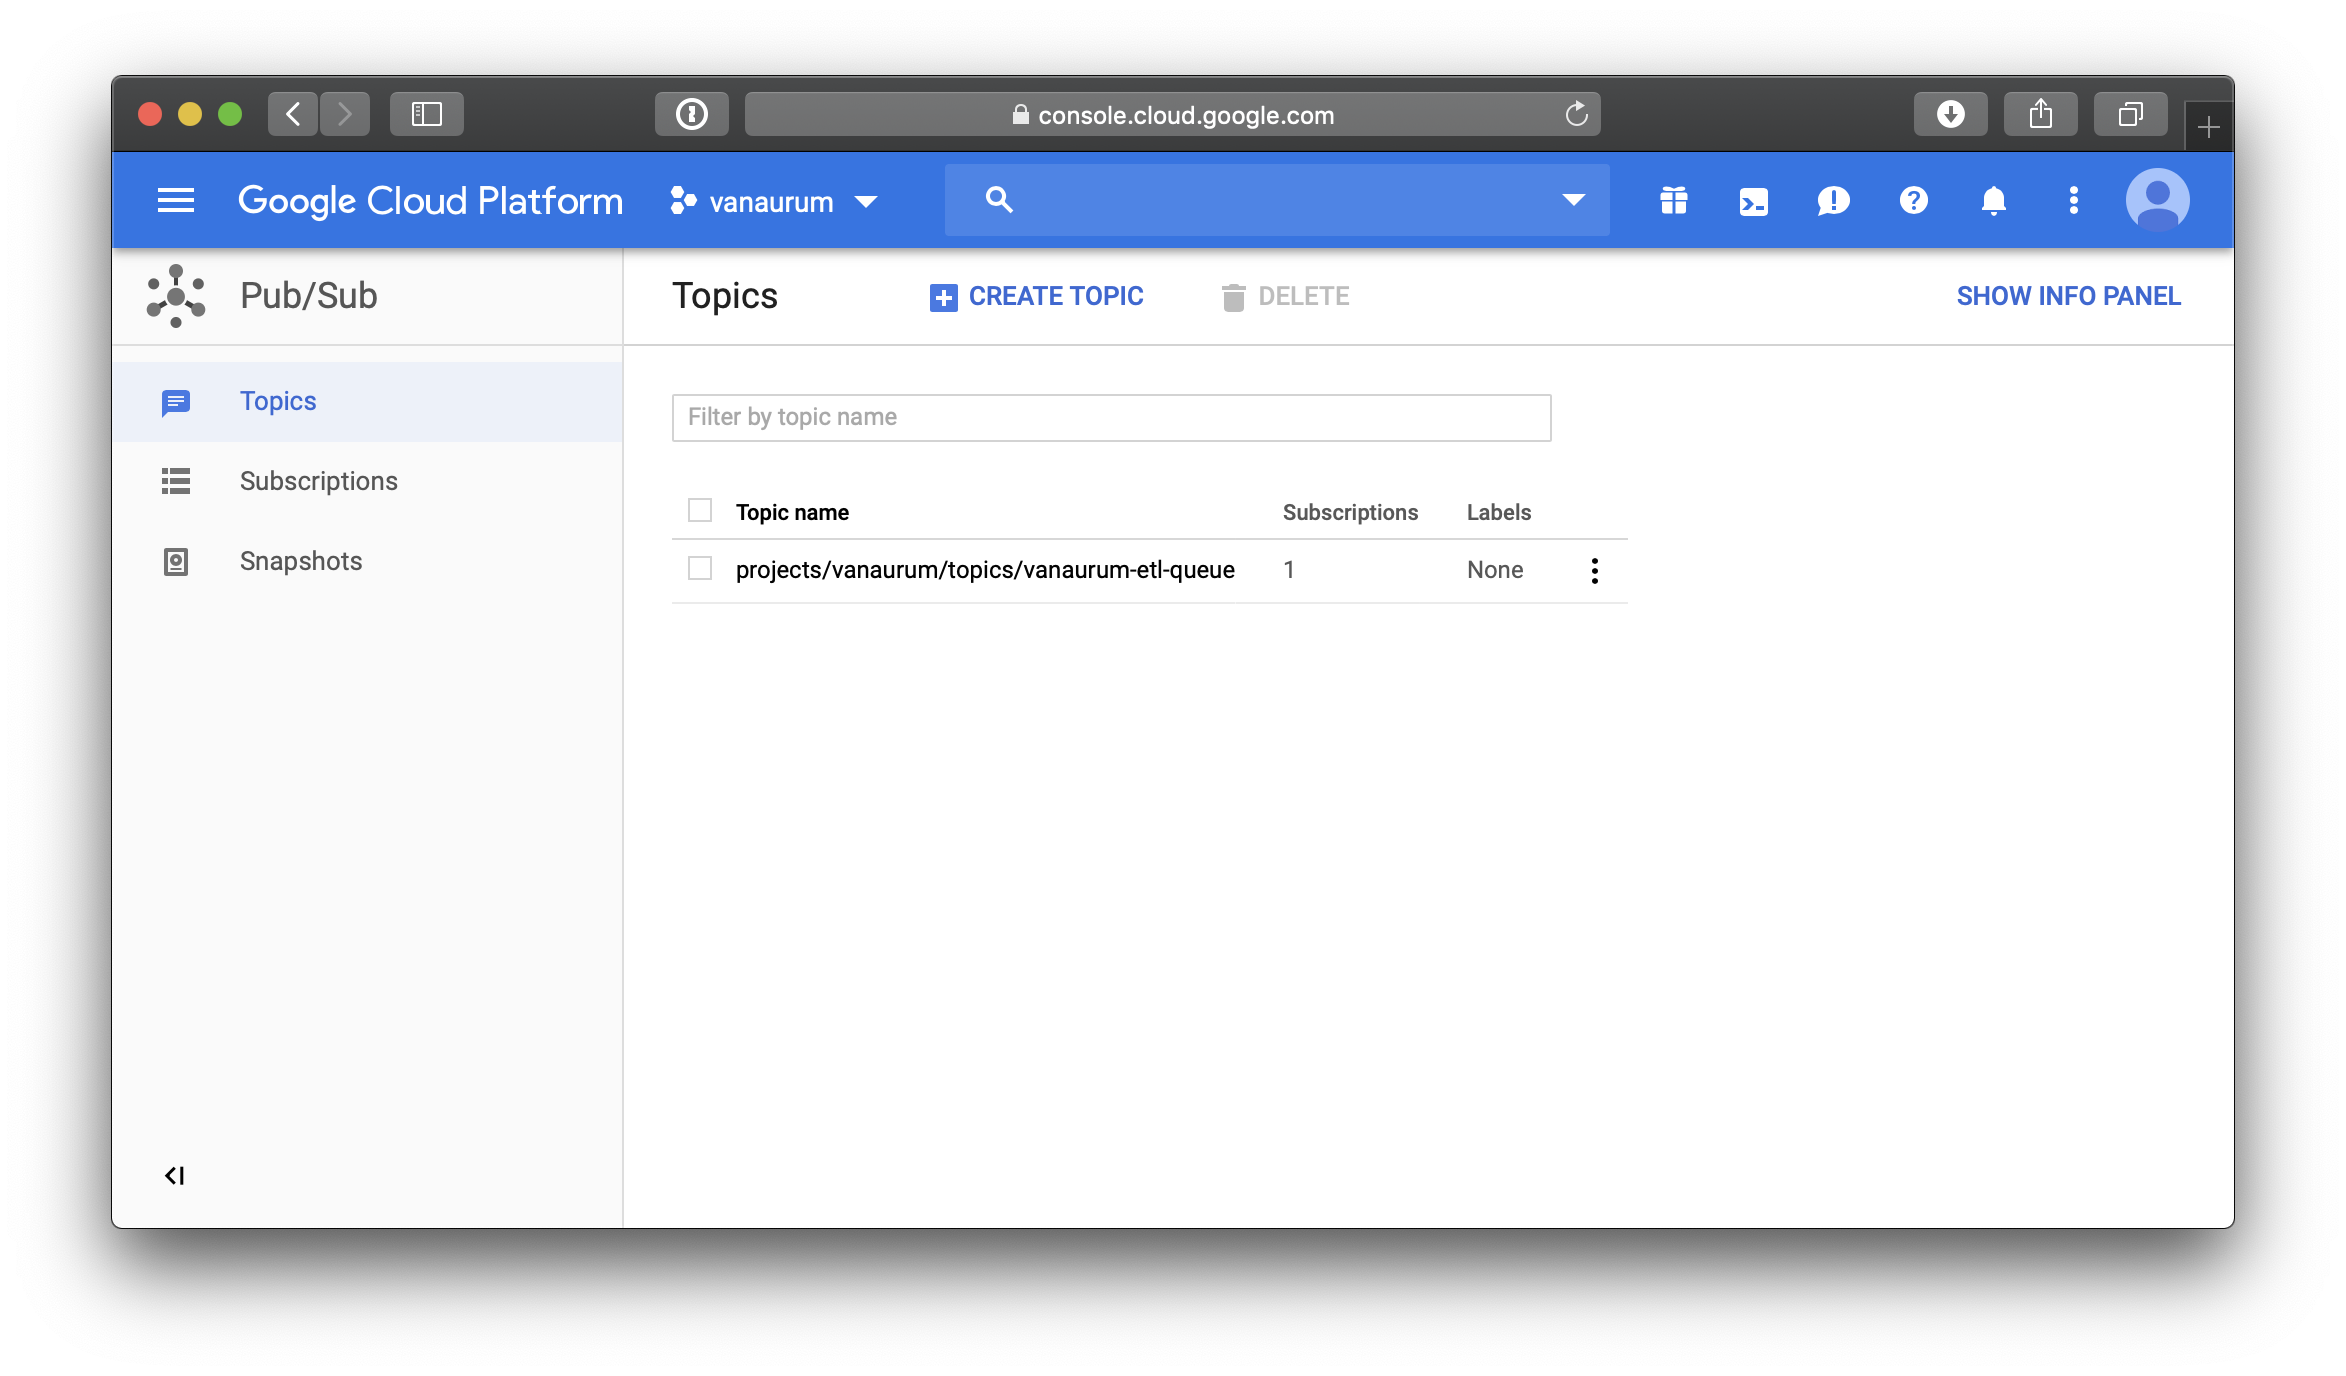
That’s it! Easy enought, right? When a publisher publishes messages to a topic, those messages will be available to every subscriber to that topic. In our example, we only need one topic, vanaurum-etl-qeueue. Our cluster node will be dynamically subscribing to the topic and pulling messages from the queue. Let’s look at how that’s implemented.
Building the Pub/Sub Message Queue
The first thing I’m going to walk through is the creation of the pub/sub message queue. This is going to be a modified version of the stand-alone code segment I’ll show later - this is just to illustrate how these messages are going to get created and published, and to show you what they look like. There are also some nuances to Google’s API that are worth mentioning.
# Standard Python Library Imports
import time

#3rd Party Imports
from google.cloud import pubsub
from google.cloud import monitoring

# Local imports
from config import data_settings


PROJECT = 'vanaurum'
TOPIC = 'vanaurum-etl-queue'
SUBSCRIPTION = 'vanaurum-etl-queue-sub'


def pub_callback(message_future):
    '''Callback method executed by message publisher
    '''
    # When timeout is unspecified, the exception method waits indefinitely.
    topic = 'projects/{}/topics/{}'.format(PROJECT, TOPIC)
    if message_future.exception(timeout=30):
        print('Publishing message on {} threw an Exception {}.'.format(
            topic, message_future.exception()))
    else:
        print(message_future.result())


def sub_callback(message):
    '''Callback method executed by message subscriber
    '''
    print('Received message: {}'.format(message))
    message.ack()


def main():
    '''For demonstration purposes:
        - publishes a list of asset classes
        - creates a subscriber to receive the messages
    '''
    # Publishes a list of asset tickers to message queue
    publisher = pubsub.PublisherClient()
    topic = 'projects/{}/topics/{}'.format(PROJECT, TOPIC)
    for asset in data_settings.ASSET_LIST:
        asset = asset.encode('utf-8')
        message_future = publisher.publish(topic, data=asset)
        message_future.add_done_callback(pub_callback)

    # Opens a subscriber connection to the message queue asynchronously
    subscriber = pubsub.SubscriberClient()
    subscription_path = 'projects/{}/subscriptions/{}'.format(PROJECT, SUBSCRIPTION)
    future = subscriber.subscribe(subscription_path, callback = sub_callback)

    # Waits until the queue is empty to exit.
    time.sleep(5)

if __name__ == '__main__':
    main()
Let’s break this down….
main() : This is a toy function that does the following:
- Creates a publisher.
- Creates a link to a topic I already have created on Google Pubsub.
- Loops through a list of assets I have in a config file called
data_settingsand does the following:- Encodes the string as
utf-8. All published messages must be encoded before sending (and decoded afterwards). You’ll get an error if you don’t do this. - Generates an instance of
Futureby making a call topublish() - A
Futureis an object that contains the results of thepublish()call. This can be used to determine if the message was published succesfully. (Don’t ask me how they arrived at this naming convention) - Callbacks can be attached to the
Futureinstance. Callbacks are an embedded method in the Google Cloud API that take aFutureinstance as their only argument by default.
- Encodes the string as
- After the asset queue is published we create a
subscriberto the publishedtopic. - Calls to the
subscribe()method also create an instance ofFuture. - Like the publisher, this
Futureinstance is passed to the callback method you declare by default - in this casesub_callback(). - In this function we just print out the acknowledgement and send a message, but in the code that follows we’re going to use this callback to actually execute our pipeline with the data payload contained in the
Futureinstance. - The
message.ack()call you see will be sent once the pipeline finishes. This tells the the publisher that the message doesn’t need to be added back to the queue.
Important
It’s easy to overlook, but this message.ack() call is what allows us to make this pipeline fault tolerant. This is all that’s required to account for any of our premptible VM instances being terminated before their job completion. Pretty sweet right?
The output from our publisher is going to be a list of message_future.result() codes from our pub_callback() method. They looks like this…
433355921992769
433355921992770
433355921992771
433355921992772
433355921992773
433355921992774
433355921992775
433355921992776
433355921992777
433355921992778
433355921992779
.
.
.
The subscriber outputs the following received messages. The data payload in here is our asset tag that each node will execute a pipeline on.
Received message: Message {
  data: b'PALLADIUM_D'
  attributes: {}
}
Received message: Message {
  data: b'PLATINUM_D'
  attributes: {}
}
Received message: Message {
  data: b'ALUMINUM_D'
  attributes: {}
}
Received message: Message {
  data: b'GOLD_D'
  attributes: {}
}
Received message: Message {
  data: b'SILVER_D'
  attributes: {}
}
Received message: Message {
  data: b'USD_D'
  attributes: {}
}
.
.
.
Good - so now we have a publisher that can generate a queue of asset names that need to be downloaded and processed. We also have a subscriber that can pull these asset names from the queue for us. The next thing we want to do is create out Kubernetes cluster.
Creating the Kubernetes Cluster
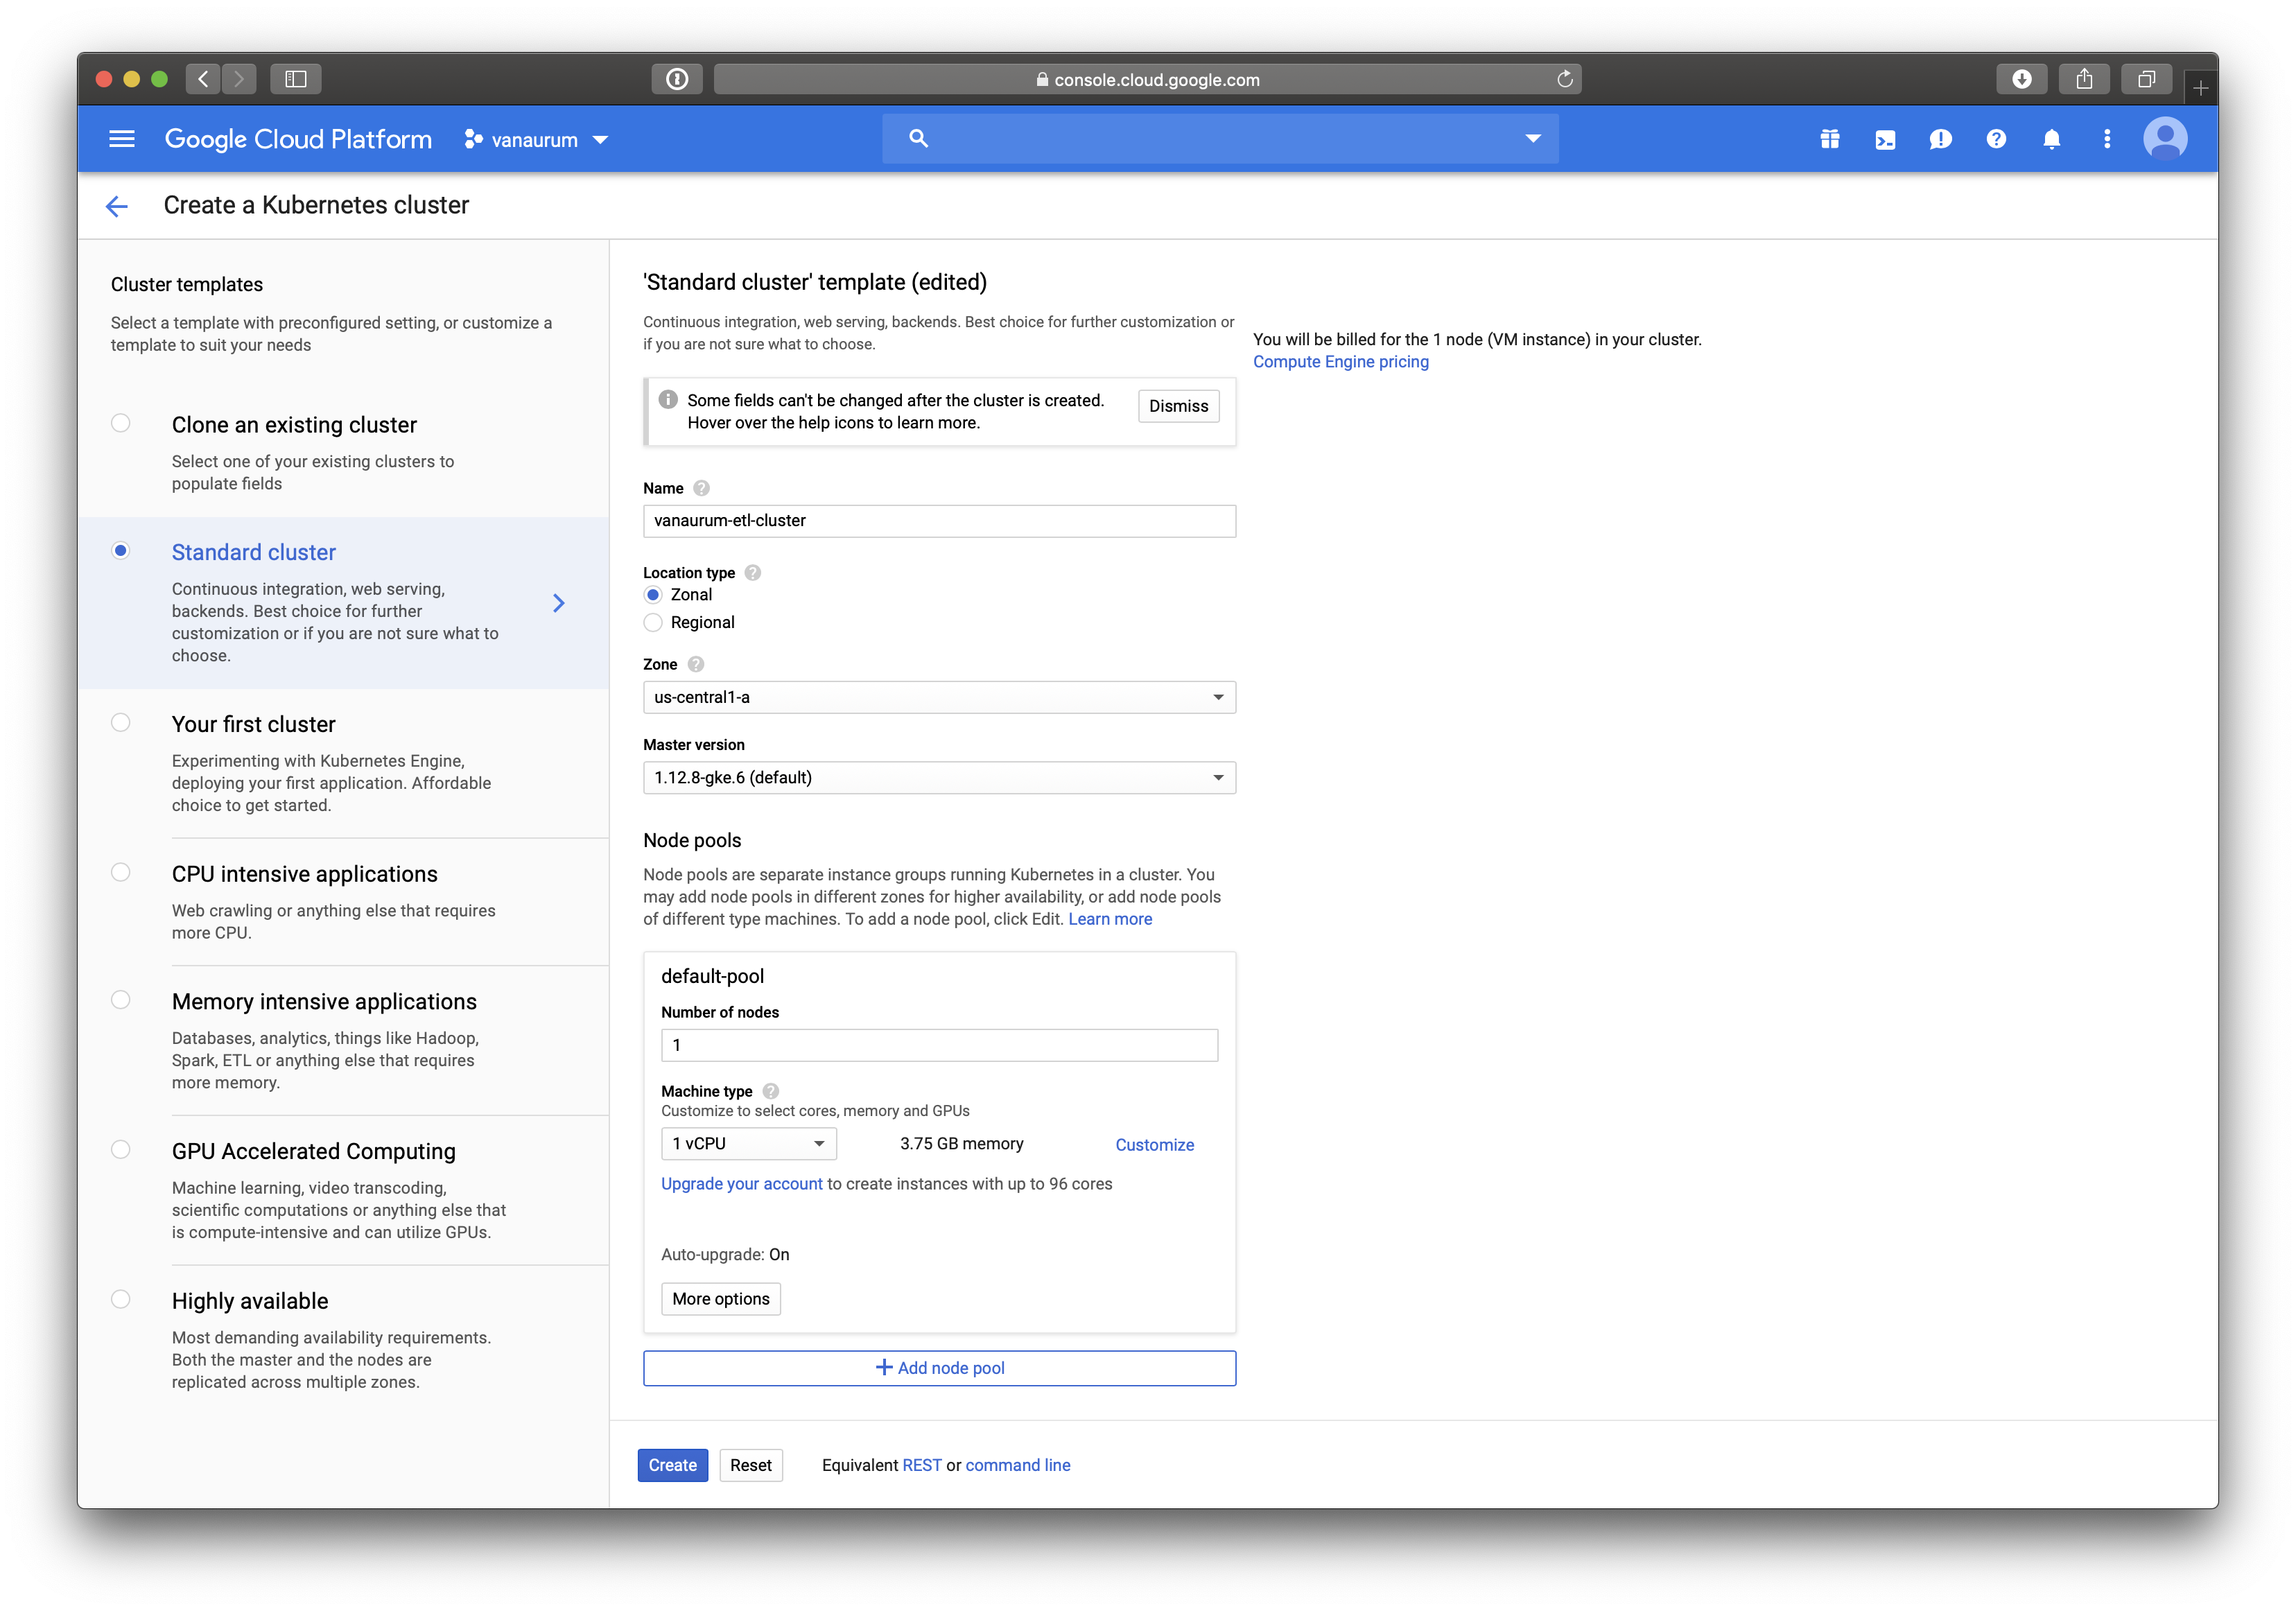
To create a Kubernetes cluster using the GCP UI, navigate to Compute –> Kubernetes Engine from the navigation menu. Click Create cluster at the top of the page.
You’ll be brought to a page that looks like the one below. Some key settings are:
- You want to set the name. Mine is set to
vanaurum-etl-cluster. - You can make this zone or regional depending on your needs. If you’re going to be moving the output from the nodes a Google Storage solution, you’ll want to either make this regional, or set the zone so that it’s the same as the zone of your storage bucket or database. This will minimize any network latency due to geography.
- Set the node pool to 1. This is going to be our master node managing the cluster - this will also be non-preemptible.
- Don’t click create yet, we still need to make the node pool…
Create Node Pool
At the bottom, click on Add Node Pool. You’ll be brought to a screen like this one:
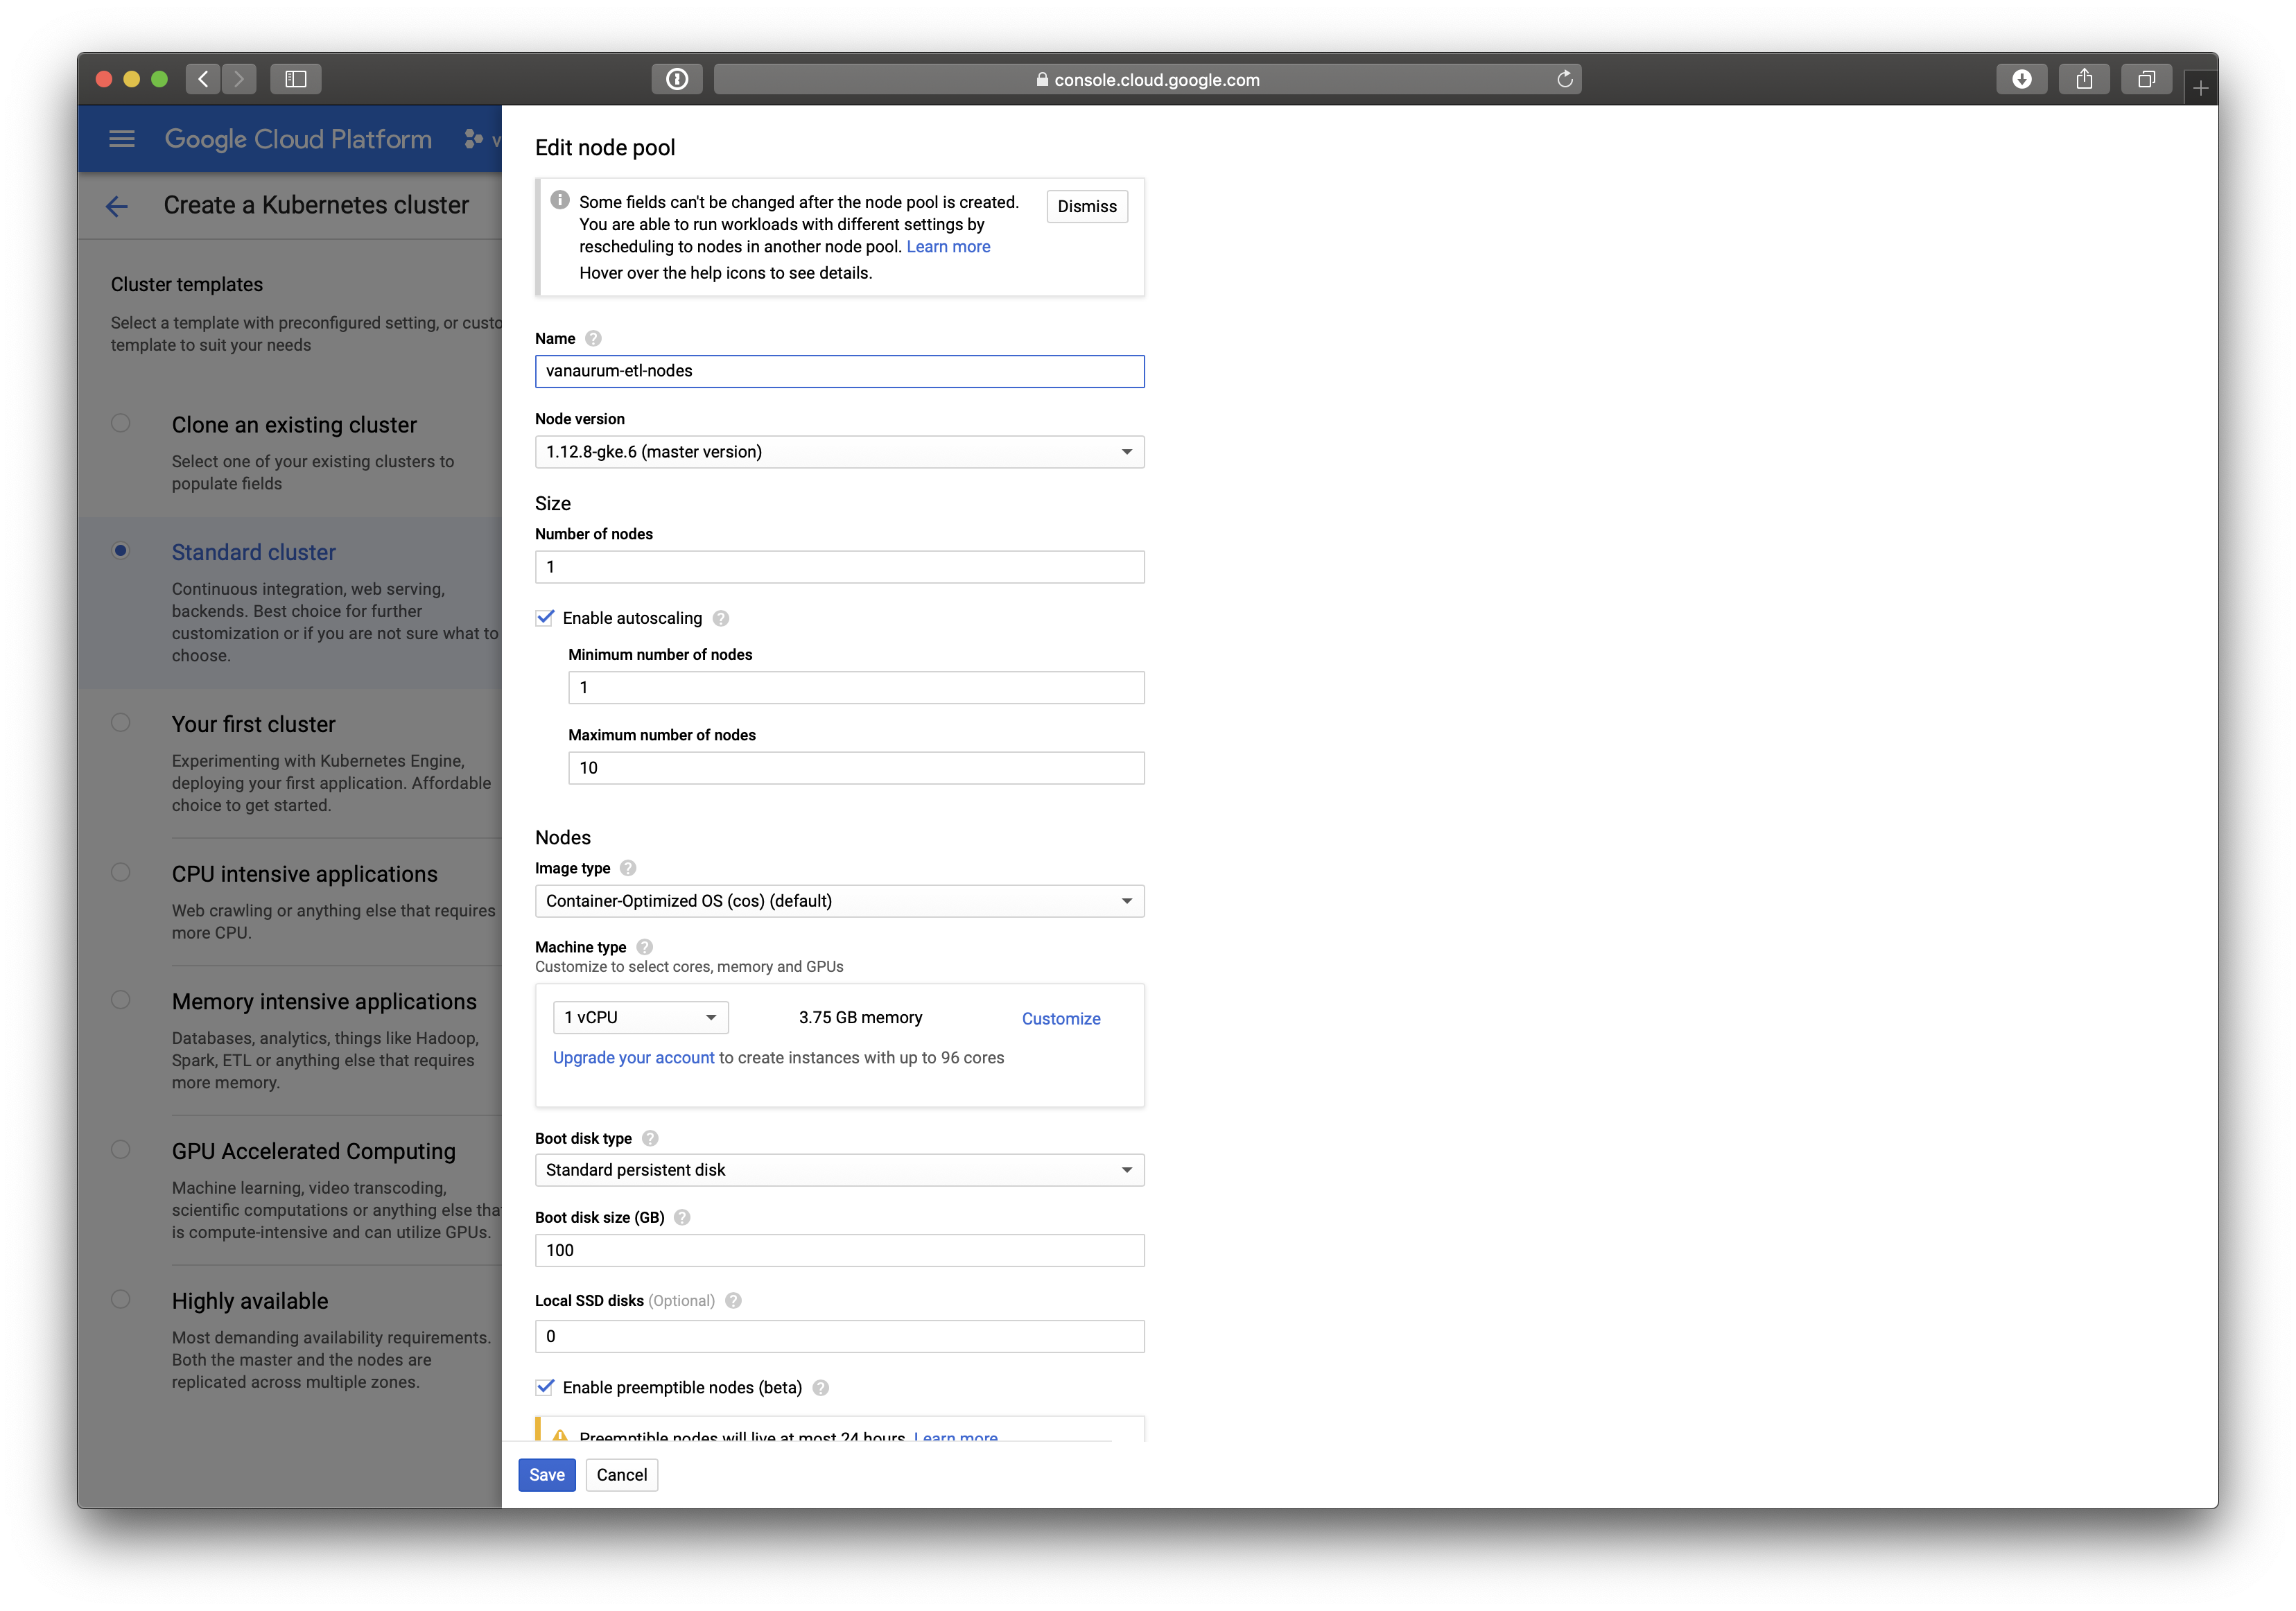
- After assigning a name, click on the Enable autoscaling option. This will present you with two more options:
- Minimum number of nodes
- Maximum number of nodes
- We want to set the minimum number of nodes to 1 (we want at least one worker!), and the maximum number to whatever you want. I’ve set mine to 10, but keep in mind you’ll be charged for all the instances. The more instances you have, the faster the job will be run and the more fault-tolerant it will be (safety in numbers).
- You can adjust the tier of the VM instance if you want - I’m leaving mine on the default tier because the amount of RAM is plenty to execute my download operations.
- The most important step: Make sure to click the Enable preemptible nodes option.
- Click Save.
Summarizing our Steps so Far…
- We have created our Pub/Sub message queue that holds our jobs in a topic.
- We’ve written our code to subscribe to that topic and pull download jobs.
- We have set up a compute cluster with one machine for Kubernetes, the cluster manager.
- We have autoscaling enabled so that if a worker dies the Kubernetes will assign another one in its place.
- When the queue is depleted, Kubernetes will automatically deallocate the cluster - saving money!
The next thing we need to do is write the actual module that will be “dockerized” and pushed to kubernetes. This will be the image that gets loaded on each of our worker nodes. We’ll also write a stand-alone module for the master node which can be run on a VM compute instances or local laptop anywhere - so long as it’s authorized to your gcloud account.
Coding the Master Node (Publisher) and Worker Nodes (Subscribers)
The code for our master node is relatively simple and is a subset of the code I showed earlier.
Master.py
from google.cloud import pubsub
from config import data_settings

PROJECT = 'vanaurum'
TOPIC = 'vanaurum-etl-queue'


def pub_callback(message_future):
    '''Callback method for confirming published messages.
    '''
    topic = 'projects/{}/topics/{}'.format(PROJECT, TOPIC)

    # When timeout is unspecified, the exception method waits indefinitely.
    if message_future.exception(timeout=30):
        print('Publishing message on {} threw an Exception {}.'.format(
            topic, message_future.exception()))
    else:
        print(message_future.result()) # Message published successfully.


def main():
    '''The main method call for publishing asset tags to the topic queue.
    '''

    publisher = pubsub.PublisherClient()
    topic = 'projects/{}/topics/{}'.format(PROJECT, TOPIC)
    for asset in data_settings.ASSET_LIST:
        asset = asset.encode('utf-8')
        message_future = publisher.publish(topic, data=asset)
        message_future.add_done_callback(pub_callback)

if __name__ == '__main__':
    main()
This script can be run using the following command line from the terminal:
python3 master.py
The worker.py module is going to be a little more involved, but it should still be familiar code to you.
Note: There are some helper methods used here for the main pipeline but I haven’t included the code because they’re not important to the scope of this article. In reality, any function can be placed in the subscriber callback to handle the messages.
worker.py
# Standard Python Library Imports
import logging
import time

# 3rd Party Imports
from google.cloud import pubsub
from google.cloud import monitoring

# Local imports
from config.data_settings import *
from config import log_settings
from ingest.utils import get_remote_data, map_data
from helpers.gcp_utils import df_to_temp_csv, upload_file


# Initialize logger so we can get console feedback on GCP
logging.basicConfig(
    level=log_settings.LOG_LEVEL,
    format=log_settings.LOG_FORMAT,
    datefmt=log_settings.LOG_DATE_FORMAT,
    )
log = logging.getLogger(__name__)

# Set project variables (You'll need to change these for your project)
# In practice you should set this in your Dockerfile script I show below...
PROJECT = 'vanaurum'
TOPIC = 'vanaurum-etl-queue'
SUBSCRIPTION = 'vanaurum-etl-queue-sub'
BUCKET = 'vanaurum-blob-data'


def update_asset(asset):
    '''Main method for executing data pipeline.

    Parameters:
        asset : string
            The name of the asset data to download (i.e GOLD)
    '''
    df = get_remote_data(asset) # Downloads data from source
    df = map_data(df, asset) # Maps and cleans the data
    path = df_to_temp_csv(df, asset+'.csv') # Converts to .csv
    upload_file(path, asset+'.csv') # Uploads to Google Cloud Storage bucket


def handle_message(message):
    asset = message.data
    asset = asset.decode('utf-8')
    log.debug('worker is processing '+asset)

    # If pipeline completes, send acknowledgment to remove asset from queue.
    try:
        update_asset(asset)
        message.ack()
        log.debug('message was acknowledged for '+asset)
    # if something goes wrong, send explicit nack() 'not acknowledged'
    # this will reassign the asset tag to the topic queue.
    except KeyboardInterrupt:
        message.nack()


def main():
    '''
    Each node will run this method to subscribe and pull from the topic queue.
    '''

    # Opens a connection to the message queue asynchronously
    subscriber = pubsub.SubscriberClient()
    subscription_path = 'projects/{}/subscriptions/{}'.format(PROJECT, SUBSCRIPTION)
    future = subscriber.subscribe(subscription_path, callback = handle_message)

    time.sleep(5)


if __name__ == '__main__':
    main()
A Note on Logging: If you haven’t read The 12 Factor App, I highly suggest it. It’s a short webpage about portable and modular code. Rather than using
print()to output, self-contained modules should write any code output to the console by default. How console logs are viewed, handled, or even activated should be controlled at the application level.
Pushing the File to Google Cloud Stoage
In our worker.py module there are four helper methods listed:
get_remote_data()map_data()df_to_temp_csv()upload_file()
The first three are specific to my project and aren’t entirely relevent to this article, but I’ll walk through the upload_file method because it integrates with Google Cloud Storage.
The following four methods work together to upload our file to Google Cloud Storage…
# Standard Python Library Imports
import datetime
import os
import tempfile
import pandas as pd

# Local Imports
from config.data_settings import keys

# 3rd Party Imports
from google.cloud import storage
from werkzeug import secure_filename
from werkzeug.exceptions import BadRequest


def _get_storage_client():
    '''Internal method for returning PROJECT_ID
    '''
    return storage.Client(
        project = os.environ.get('PROJECT_ID', 'PROJECT_ID not set')


def _check_extension(filename, allowed_extensions):
    '''Checks if file extension is permitted as a security precaution before upload.

    Allowed extensions are: 'png', 'jpg', 'jpeg', 'gif', 'csv'
    '''
    if ('.' not in filename or
            filename.split('.').pop().lower() not in allowed_extensions):
        raise BadRequest(
            "{0} has an invalid name or extension".format(filename))


def _safe_filename(filename):
    """
    Generates a safe filename that is unlikely to collide with existing objects
    in Google Cloud Storage.

    ``filename.ext`` is transformed into ``filename-YYYY-MM-DD-HHMMSS.ext``
    """
    filename = secure_filename(filename)
    date = datetime.datetime.utcnow().strftime("%Y-%m-%d-%H%M%S")
    basename, extension = filename.rsplit('.', 1)
    return "{0}-{1}.{2}".format(basename, date, extension)


def df_to_temp_csv(dataframe, filename):
    '''Converts dataframe to .csv file and returns the path to the temp file
    '''
    directory_name = tempfile.mkdtemp()
    dataframe.to_csv(directory_name+'/'+filename)
    return directory_name+'/'+filename


def upload_file(path_to_file, filename, safe_filename=False):
    """
    Uploads a file to a given Cloud Storage bucket and returns the public url
    to the new object.

    Parameters:
        path_to_file: string
            Path to the file that needs to be pushed to Google Cloud Storage.
        filename : string
            Name of the file to be found at path_to_file
        safe_filename: bool, optional (default = False)
            Allows the user to avoid filename collisions and overwrites.

    Returns:
        url : string
            Link to the uploaded file
    """
    _check_extension(filename, keys.ALLOWED_EXTENSIONS)

    # If user wants a safe filename...
    if safe_filename:
        filename = _safe_filename(filename)

    client = _get_storage_client()
    bucket = client.bucket(keys.CLOUD_STORAGE_BUCKET)
    blob = bucket.blob(filename)
    blob.upload_from_filename(path_to_file)

    url = blob.public_url

    if isinstance(url, six.binary_type):
        url = url.decode('utf-8')

    return url
Packaging and Containerizing the Program with Docker
Running code on Kubernetes clusters requires an image to be created. All this means is that we have to package up our code into a self-contained entity that tells the virtual machine everything it needs to do to execute the code. It needs three basic things:
- Dependencies and Environment Variables: All the code that is imported and that the code relies on to run. This includes keys, environment variables, etc…
- Code: The modules themselves.
- Go Button: Something needs to actually execute the code to run on these containers.
We’re going to use Docker for this. Docker allows us to package our code into a single file and push it to Google Cloud Platform. An instance of each of this Docker images is a “container”, and these will be copied dynamically to each node in our Kubernetes cluster as needed behind the scenes.
Your package needs a Dockerfile in the root directory. Mine looks like this:
#Dockerfile
FROM ubuntu:16.04

RUN apt-get update && apt-get install -y python3-pip curl
RUN pip3 install -U setuptools
RUN pip3 install --upgrade pip
COPY requirements.txt .
RUN pip3 install -r requirements.txt

RUN echo "deb http://packages.cloud.google.com/apt cloud-sdk-zesty main" | \
    tee -a /etc/apt/sources.list.d/google-cloud-sdk.list && \
    curl https://packages.cloud.google.com/apt/doc/apt-key.gpg | apt-key add - && \
    apt-get update && apt-get install -y google-cloud-sdk

WORKDIR /app
COPY  worker.py vanaurum-a6b766a3f2d7.json ./
COPY config/ /app/config/
COPY helpers/ /app/helpers/
COPY ingest/ /app/ingest/
ENV GOOGLE_APPLICATION_CREDENTIALS=/app/vanaurum-a6b766a3f2d7.json
RUN gcloud auth activate-service-account --key-file=$GOOGLE_APPLICATION_CREDENTIALS
CMD python3 worker.py
The Dockerfile is just a set of commands to run in the VM shell to set up the node to run your program. You can read this script as:
- Using Ubuntu version 16.04
- Update package tools on the base image and install Python 3
- Upgrade Python 3 setup tools
- Upgrade Python 3 pip installer
- Copy the
requirements.txtfile over to the container image (so we can install dependencies from it) - Install all the dependencies found in
requirements.txt - Download the Google Cloud SDK image from Google’s server and install it on the image
- Create thr working directory
app - Copy worker.py and my unique security token to the new container image.
- Copy the directories config, helpers, and ingest into the working directory
appunder the same names - Store the path to my authentication credentials in an environment variable on the virtual machine
- Authenticate my gcloud service account using the security token found at the path created in the last step.
- Once this is all done, run the command “python3 worker.py” to run the worker scripts.
So to reiteratate, this script will be run on each node kubernetes decides to allocate to us. Docker is pretty awesome, but sometimes it can be finicky to get the build right.
You can build this image on your machine (download and install docker first) by running this in the commnd line (Replacing the two variables with ones specific to your project):
docker build -t gcr.io/<THE NAME OF YOUR GCLOUD PROJECT>/<CHOOSE A NAME FOR THIS IMAGE>.
For me, this looks like:
docker build -t gcr.io/vanaurum/worker.
This builds this image with a path name suitable for Google Container Registry. When the build is done, you can push it to the GCR using the command:
gcloud docker -- push gcr.io/vanaurum/worker
You can test if the build will work by running it locally using docker:
docker run -t gcr.io/vanaurum/worker
Spinning-up the Kubernetes Cluster
The next thing we need to do is deploy our docker image to nodes on the Kubernetes cluster. This where the value of Kubernetes comes in. Normally we would have to ssh into each node and execute the scripts manually. Kubernetes manages all of this for us, but first we need to tell is what to do.
Kubernetes requires a job.yaml file to be uploaded which has the details of the job. Mine looks like this:
# job.yaml
apiVersion: batch/v1
kind: Job
metadata:
  name: vanaurum-etl
spec:
  parallelism: 10
  template:
    metadata:
      name: vanaurum-etl
    spec:
      containers:
        - name: worker
          image: gcr.io/vanaurum/worker
          imagePullPolicy: Always
          resources:
            requests:
              cpu: 0.51
      restartPolicy: OnFailure
This file is relatively straightforward, we need to declare a name for the job under metadata, the number of parallel nodes under parallelism, the name of our container, and where to find it. To push this file to Kubernetes, you’ll need to install the tools on you machibe (either locally or on a VM).
gcloud components install kubectl
Then authenticate…
gcloud container clusters get-credentials vanaurum-etl-cluster
To run the cluster, all we have to do is run master.py to publish our assets to Pub/Sub, and then push the yaml file to Google Cloud:
python3 master.py
kubectl create -f job.yaml
That’s it! If you have any questions regarding this content - feel free to reach out to me in the e-mails listed in the footer.