Complete Guide to Installing PySpark on MacOS
Author :: Kevin Vecmanis
Getting PySpark set up locally can be a bit of an involved process that took me a few tries to get right. In this post I cover the entire process of succesfully installing PySpark on MacOS. Enjoy!
In this article you will learn:
- The packages you need to download to install PySpark
- How to properly setup the installation directory
- How to setup the shell environment by editing the ~/.bash_profile file
- How to confirm that the installation works
- How to run PySpark in Python Shell
- How to run PySpark in Jupyter Notebooks
- Using findspark to run PySpark from any directory
Table of Contents
- Introduction
- Step 1: Set up your $HOME folder destination
- Step 2: Download the appropriate packages
- Step 3: Extract the downloaded files
- Step 4: Setup shell environment by editing the ~/.bash_profile file
- Step 5: Reload the bash file
- Step 6: Run the installation
- Step 7: Run PySpark in Python Shell and Jupyter Notebook
Introduction
If you’re here because you have been trying to install PySpark and you have run into problems - don’t worry, you’re not alone! I struggled with this install my first time around. Make you follow all of the steps in this tutorial - even if you think you don’t need to!
Step 1: Set up your $HOME folder destination
What is $HOME? If you’re on a Mac, open up the Terminal app and type cd in the prompt and hit enter. This will take you to your Mac’s home directory. For me, it’s called vanaurum. If you open up Finder on your Mac you will usually see it on the left menu bar under Favorites. This what it looks like on my Mac:
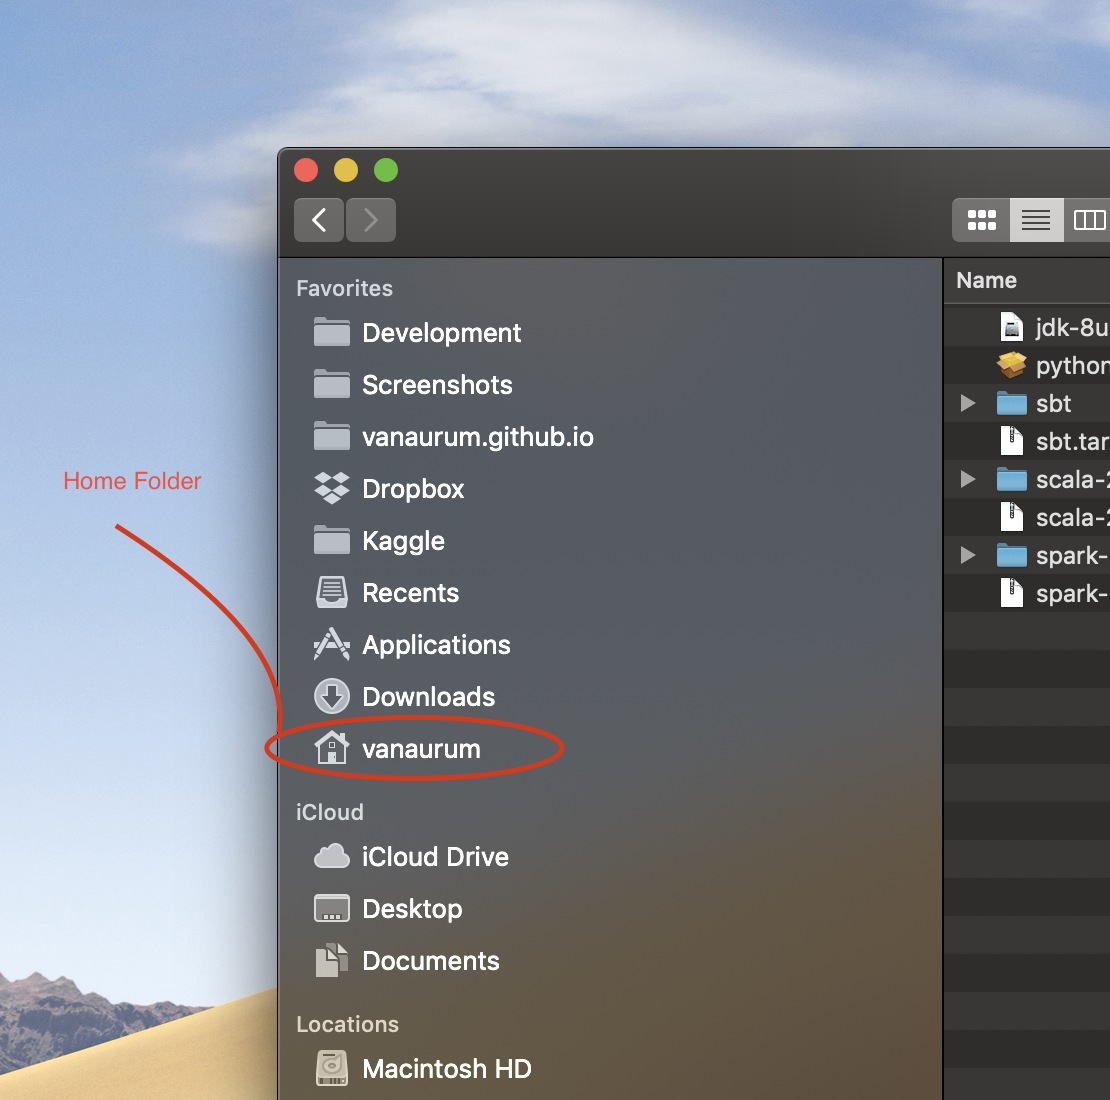
This folder equates to Users/vanaurum for me. Throughout this tutorial you’ll have to be aware of this and make sure you change all the appropriate lines to match your situation – Users/<your username>.
The next thing we’re going to do is create a folder called /server to store all of our installs. The path to this file will be, for me Users/vanaurum/server. Or, equivalently, $HOME/server.
In the terminal app, enter the following:
cd
mkdir server
Note: cd changes the directory from wherever you are to the $HOME directory. If you’re in a directory, the cd .. command brings you up one folder, and cd <folder_name> brings you down one level into the specified folder_name directory.
Step 2: Download the Appropriate Packages.
Spark’s documentation states that in order to run Apache Spark 2.4.3 you need the following:
- Java 8+
- Python 2.7+ or 3.4+
- Scala 2.11
Click on each of the following links and download the zip or tar files to your $HOME/server directory that we just created:
- spark-2.4.3-bin-hadoop2.7.tgz
- jdk-8u162-macosx-x64.dmg
- scala-2.11.12.tgz
- sbt-0.13.17.tgz
- python-3.6.4-macosx10.6.pkg (Optional)
All of these files should be copied over to your $HOME/server folder.
Step 3: Extract the downloaded files
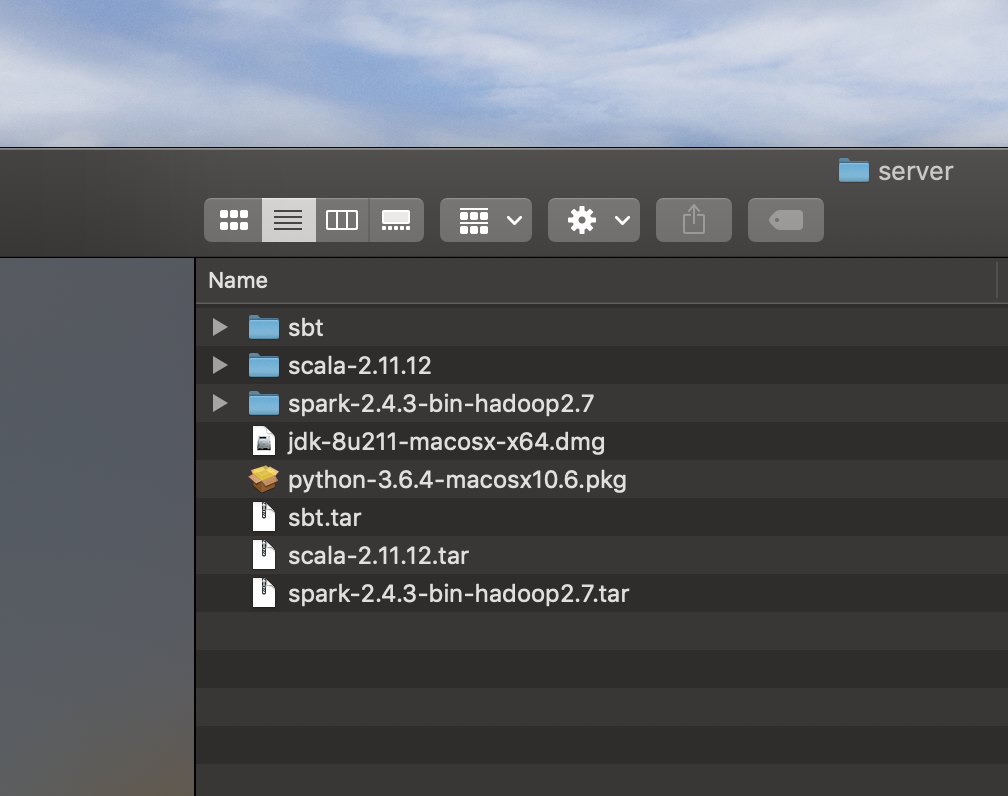
Double click on each installable that you downloaded and install/extract them in place (Including Java and Python packages!). When you’re done you should see three new folders like this:
Step 4: Setup shell environment by editing the ~/.bash_profile file
The .bash_profile is simply a personal configuration file for configuring your own user environment. This file can be configured however you want - but in order for Spark to run, your environment needs to know where to find the associated files. This is what we’re going to configure in the .bash_profile file.
We creates the .bash_profile with the following command line commands.
cd
touch .bash_profile
open -e .bash_profile
touch is the command for creating a file. open -e is a quick command for opening the specified file in a text editor.
This is what my .bash_profile looks like. This is what yours needs to look like after this step!
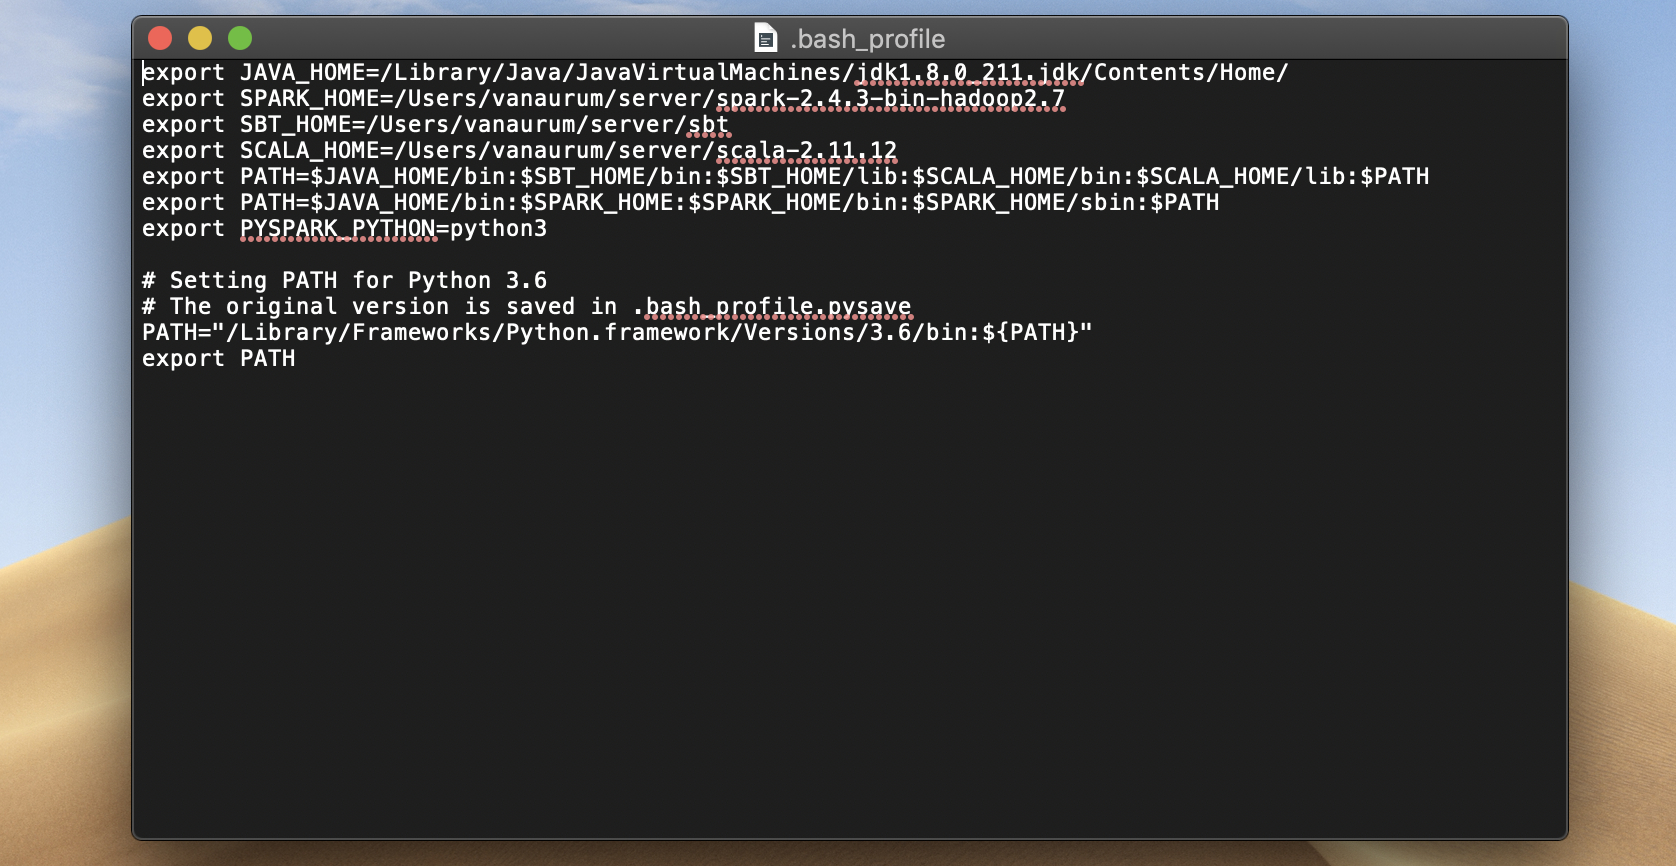
Copy the following into your .bash_profile and save it. Note that in Step 2 I said that installing Python was optional. If you skipped that step, you want have the last 4 lines of this file. If you do have them, make sure you don’t duplicate the lines by copying these over as well!
Important: There are two key things here:
- Make sure you swap all instances of
vanaurumfor your own username. - The files you downloaded might be slightly differed versions than the ones listed here. If that’s the case, make sure all your version digits line up with what you have installed. For example, I have
/jdk1.8.0_211.jdk, but you might have a new version that needs to be modified in your.bash_profile.
export JAVA_HOME=/Library/Java/JavaVirtualMachines/jdk1.8.0_211.jdk/Contents/Home/
export SPARK_HOME=/Users/vanaurum/server/spark-2.4.3-bin-hadoop2.7
export SBT_HOME=/Users/vanaurum/server/sbt
export SCALA_HOME=/Users/vanaurum/server/scala-2.11.12
export PATH=$JAVA_HOME/bin:$SBT_HOME/bin:$SBT_HOME/lib:$SCALA_HOME/bin:$SCALA_HOME/lib:$PATH
export PATH=$JAVA_HOME/bin:$SPARK_HOME:$SPARK_HOME/bin:$SPARK_HOME/sbin:$PATH
export PYSPARK_PYTHON=python3
#
# Setting PATH for Python 3.6
# The original version is saved in .bash_profile.pysave
PATH="/Library/Frameworks/Python.framework/Versions/3.6/bin:${PATH}"
export PATH
Save and close this file.
Step 5: Reload the bash file
Now that our .bash_profile has changed, it needs to be reloaded. Every time you make a change to the .bash_profile you should either close the Terminal and reload it, or run the following command:
source ~/.bash_profile
Step 6: Run the installation
Let’s confirm that we’ve done everything properly:
Check the Java version by typing jave -version in the terminal. You should see something like this:
$ java -version
java version "1.8.0_211"
Java(TM) SE Runtime Environment (build 1.8.0_211-b12)
Java HotSpot(TM) 64-Bit Server VM (build 25.211-b12, mixed mode)
Next we’ll test PySpark by running it in the interactive shell. If you type pyspark in the terminal you should see something like this:
$ pyspark
Python 3.6.4 (v3.6.4:d48ecebad5, Dec 18 2017, 21:07:28)
[GCC 4.2.1 (Apple Inc. build 5666) (dot 3)] on darwin
Type "help", "copyright", "credits" or "license" for more information.
19/06/01 16:52:44 WARN NativeCodeLoader: Unable to load native-hadoop library for your platform... using builtin-java classes where applicable
Using Spark's default log4j profile: org/apache/spark/log4j-defaults.properties
Setting default log level to "WARN".
To adjust logging level use sc.setLogLevel(newLevel). For SparkR, use setLogLevel(newLevel).
Welcome to
      ____              __
     / __/__  ___ _____/ /__
    _\ \/ _ \/ _ `/ __/  '_/
   /__ / .__/\_,_/_/ /_/\_\   version 2.4.3
      /_/

Using Python version 3.6.4 (v3.6.4:d48ecebad5, Dec 18 2017 21:07:28)
SparkSession available as 'spark'.
>>>
Hit CTRL-D or type exit() to get out of the pyspark shell.
If you made it this far without any problems you have succesfully installed PySpark. Next, we’re going to look at some slight modifications required to run PySpark from multiple locations.
Step 7: Run PySpark in Python Shell and Jupyter Notebook
So far we have succesfully installed PySpark and we can run the PySpark shell successfully from our home directory in the terminal. Now I’m going to walk through some changes that are required in the .bash_profile, and an additional library that needs to be installed to run PySpark from a Python3 terminal and Jupyter Notebooks.
Right now, if you run the following in terminal:
cd
Python3
import pyspark
You will likely get the following error message:
ModuleNotFoundError: No module named 'pyspark'
This is happening because we haven’t linked our Python installation path with the PySpark installation path. We can do this in the .bash_profile. Let’s open up our .bash_prifle again by running the following in the terminal:
cd
open -e '.bash_profile'
We’re going to add the following 3 lines to our profile:
export PYTHONPATH=$SPARK_HOME/python/:$PYTHONPATH
export PYSPARK_DRIVER_PYTHON="jupyter"
export PYSPARK_DRIVER_PYTHON_OPTS="notebook"
This is going to accomplish two things - it will link our Python installation with our Spark installation, and also enable the drivers for running PySpark on Jupyter Notebook.
Our .bash_profile should look like this now:
export JAVA_HOME=/Library/Java/JavaVirtualMachines/jdk1.8.0_211.jdk/Contents/Home/
export SPARK_HOME=/Users/vanaurum/server/spark-2.4.3-bin-hadoop2.7
export SBT_HOME=/Users/vanaurum/server/sbt
export SCALA_HOME=/Users/vanaurum/server/scala-2.11.12
export PATH=$JAVA_HOME/bin:$SBT_HOME/bin:$SBT_HOME/lib:$SCALA_HOME/bin:$SCALA_HOME/lib:$PATH
export PATH=$JAVA_HOME/bin:$SPARK_HOME:$SPARK_HOME/bin:$SPARK_HOME/sbin:$PATH
export PYSPARK_PYTHON=python3
export PYTHONPATH=$SPARK_HOME/python/:$PYTHONPATH
export PYSPARK_DRIVER_PYTHON="jupyter"
export PYSPARK_DRIVER_PYTHON_OPTS="notebook"
#
# Setting PATH for Python 3.6
# The original version is saved in .bash_profile.pysave
PATH="/Library/Frameworks/Python.framework/Versions/3.6/bin:${PATH}"
export PATH
Once these changes are made, save and close the profile and then run source ~/.bash_profile to update these changes in your environment.
Now, try importing pyspark from the Python3 shell again.
cd
python3
import pyspark
You’ll likely get another message that looks like this:
ModuleNotFoundError: No module named 'py4j'
py4j is a small library that links our Python installation with PySpark. Install this by running pip install py4j. Now you’ll be able to succesfully import pyspark in the Python3 shell!
Import PySpark in Jupyter Notebook
To run PySpark in Jupyter Notebook, open Jupyter Notebook from the terminal.
cd
jupyter notebook
(You may need to install jupyter notebook if you get a ModuleNotFound error)
Once The Jupyter Notebook server opens in your internt browser, start a new notebook and in the first cell simply type import pyspark and push Shift + Enter.
Using findspark to import PySpark from any directory.
findspark is a package that lets you declare the home directory of PySpark and lets you run it from other locations if your folder paths aren’t properly synced.
To install findspark, run:
pip3 install findpark
To use it in a python3 shell (or Jupyter Notebook), run the following:
>>> import findspark
>>> findspark.init('Users/vanaurum/server/spark-2.4.3-bin-hadoop2.7')
>>> import pyspark
findspark.init('Users/vanaurum/server/spark-2.4.3-bin-hadoop2.7') initializes the correct path to your Spark installation. Note that you’ll have to change this to whatever path you used earlier (This path is for my computer only)!
That’s it!
I hope you enjoyed this post